Talking with haptics
For our final lab (or fourth?) in the CanHap course, we were tasked with using haply to communicate affective meaning at a high level. For example, can someone using the haply device made to be felt calm or angry or excited.
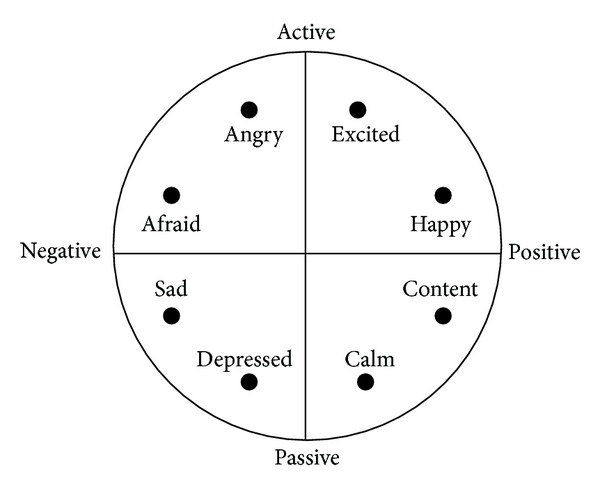
For our final lab (or fourth?) in the CanHap course, we were tasked with using haply to communicate affective meaning at a high level. For example, can someone using the haply device made to be felt calm or angry or excited. Specifically we had to communicate 3 words, I picked calm, angry, and agitated (excited). I picked these three as they fall on different quadrants of the valence-arousal space and are also reasonably separated from each other, which should allow being able to distinguish between them more easily (after all we have to make this work on the haply).

Haplyfying the words
Framework
The previous labs and project work has already given a good idea about what to expect with the haply and what can be done. When thinking of how to convey these words, the analogy that kept coming to my mind was holding your finger in running water or having your hand out in the water while riding a boat (maybe because I can’t wait for the Winnipeg winter to be over, ?). Building on this idea what I started implementing was the following:
- The user holds the actuator which is moved to the center of the screen when the application starts.
- When the haptic feedback is rendered, the user feels what is being rendered and describe the word.
It didn’t take long for me to realize that that might not be something that can be done effectively with the haply. Mainly because the friction and other hardware related parameters require a larger force to applied which makes the meaning I am trying to convey muddled. This was specially tricky as I was trying to render “calm”. After trying a few other things, the approach I settled for is the following:
- The user moves the end actuator to the center of a circle that is displayed. This circle is within a larger circle.
- The user holds the end actuator on the smaller circle inside in a such away it allows the system to control the actuator.
- When the user reaches this circle, the haptic feedback will be rendered. The aim of the haptic feedback is to render force(s) that pushes the end-actuator outside the outer circle.
- The user can experience the same haptic feedback by moving the end-actuator back to the inner circle.
While testing the system, I also realized that the feedback provided is relative. As in, the user will have to have experienced all the feedback before describing it. Which is even more evident when I asked my friend to try it out; which I’ll touch on later in this blog.
The implementation
The complete implementation is available in github
The main loop is in three stages. Each stage renders the haptic feedback for calm, angry, and agitated, respectively. The “calm” was a tricky one. What I had in mind for it is have a gentle push of the end actuator. I implemented this by gradually ramping up the force rendered until the end-actuator gets pushed out of the outer circle. Since haply doesn’t do “gentle” very well I had to try a few different combinations. What worked for me is to have an additional dampening effect to smoothen the ramping force. The other two were a variation of this implementation which can be seen below. For “angry”, instead of ramping up, after a small delay, a large force is rendered instantaneously. For “agitated”, It was the same as “calm” but I added a random noise, which creates a vibration.
Another thing that I had tried at the beginning is to have the direction being rendered to be random, i.e. the direction in which the end actuator gets pushed. Later on I decided against it. The reason was that interpreting haptic feedback is extremely subjective as it is. Reducing the predictability of the feedback makes effective affective communication even more complicated. Hence, I had the direction being rendered to be towards the left side of the screen.
The main loop which renders the haptic feedback can be seen below. (From github (L143 - L172))
levelAngle = 0; //random(-PI, PI);

switch (currentLevel){
case 1:// calm
    levelProgress = millis(){01_out} - levelBase;
    levelForce = 1.5 + levelProgress * 0.0002;
    fEE.add(levelForce * cos(levelAngle) , levelForce * sin(levelAngle));
    s.h_avatar.setDamping(500);
    break;
case 2:// angry
    levelProgress = millis() - levelBase;

    // delayed force push
    if (levelProgress > 2000)
    {
	levelForce = 3 + levelProgress * 0.0002;
	fEE.add(levelForce * cos(levelAngle) , levelForce * sin(levelAngle));
    }
    break;
case 3:// agitated
    levelProgress = millis() - levelBase;
    levelForce = 1.5 + levelProgress * 0.001;
    fEE.add(levelForce * cos(levelAngle) , levelForce * sin(levelAngle));

    // adding noice
    levelAngle = random(-PI, PI);
    fEE.add(1.5 * cos(levelAngle) , 1.5 * sin(levelAngle));
    break;
}
fEE.limit(3.5);
The following is the video clip of me using the system for the three different words.
User test
For the user test, I asked one of my friends to try out my implementation. While he’s an experienced HCI researcher and designer, he didn’t have much experience with haptics. As described above, I explained what he had to do. Essentially I asked him to “experience” the three different feedback’s and then describe what emotion or feeling he’d attach to it at the end. For each word I had here are his responses.
- For Calm: “Gentle”
- For angry: “Rude”
- For agitated: “Annoying”
I was happy with the results, atleast the responses I got were close to the expected responses with regards to where they fall on the valence-arousal space (the last one was a little of though, nut not suprising).
Reflection
It was interesting to see the previous labs as well as the readings we have been doing for the course come together. We had learned how affective communication works as well as how haptics is a subjective user interface. And what are the approaches we can take to make the experience more translatable between different people. Seeing it in action was quite satisfying. I would not have been able to even think of this before this course (I also have become alot more comfortable using the language commonly used by hapticians).
User test
My friend made a few interesting comments I think are worth mentioning. When I had described the task to my friend, he thought of the UI as a mouse pointer the idea that the feedback is suppose to push him away from this target sounded unintuitive to him. I explained to think of the system as a notification system as follows: someone is trying to relay an “emotion” or “feeling”, and you received a notification, now you want to know what he relayed, and you are using the system I have explained.
Once he stared using the system, the first haptic feedback rendered was for “calm”. Immediately he says, “this is annoying”. But once He had tried all the different cases, he described the first one as “gentle”. Which emphasizes the fact that haptics is subjective and also tends to be relative. I would assume using the random direction of force feedback I described earlier would have been confusing even more.
Haply has audio output?
Then there is actually describing what I have done. This was interesting to me. So far when it comes to setting up my blogs the use of GIF’s were sufficient to demonstrate what I had achieved or done. Which was not the case with this lab. I have the original GIF I generated below.

What stood out to me is that it looked like I was moving the actuator instead of the system moving it. Which is not what I wanted to demonstrate. So I had to go the youtube route (I generally prefer all the content be maintained in one place). The only difference between the two is the sound. We were told that audio-visual feedback should not be used, and I didn’t. But when I started writing the blog, I am wondering if the audio feedback might have effected the results.
Overall, this was an interesting lab, which makes me appreciate all that I have learned during the course so far.